Monday, November 5, 2012

WOTG for Cards - Pear & Partridge and Avonlea

In response to requests from their customers and consultants, Close To My Heart put together the enormous popularity of their Workshops on the Go (WOTG) and their mad card-making skills and came up with two fabulous cardmaking workshops in the Autumn 2012 Idea Book.

The first project I made after I returned from CTMH Convention in July was these cards made with the Avonlea Cardmaking Kit (G1041).

 
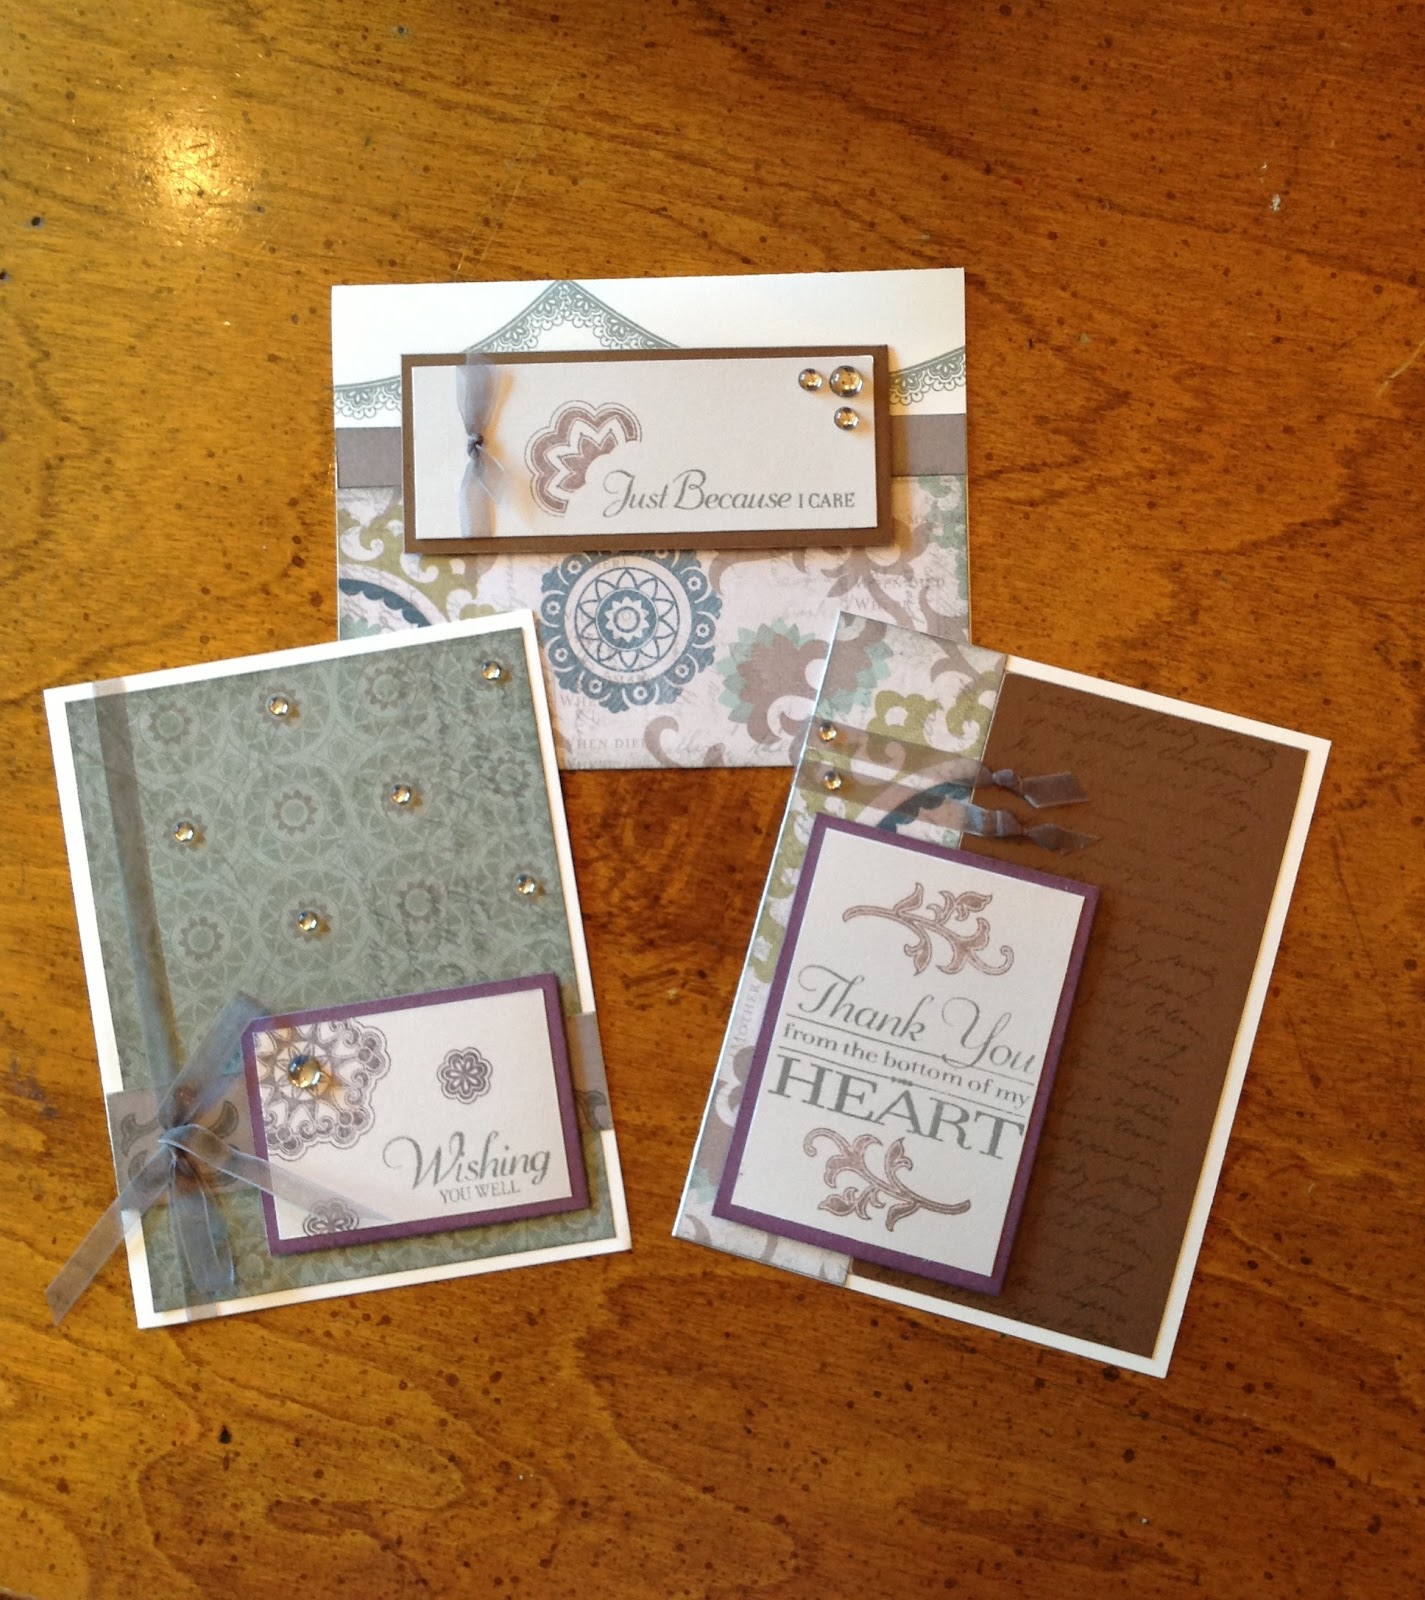
The kit comes with card bases, envelopes, patterned and solid cardstock, ribbon, embellishments, an exclusive stamp set, and complete directions for the cards. These cards were very easy to make and I think they are lovely. I just have to point out one detail-- on the top card, notice the stamped detail that looks like a swag of lace. That image is made with a stamp that looks like a straight piece of lace when you see it in the package. One of the wonderful characteristics of our clear acrylic stamps is that you can bend them -- giving you even greater versatility.
 
When I finished making these cards, I thought they would make a wonderful gift, so I poked around in my stash and found this unfinished chipboard purse. I'm pretty sure I picked it up in a white elephant exchange. I always liked the shape, but I wasn't sure how to use it. Since I also had the Avonlea paper pack (X7155B), I picked out a paper that coordinated with the cards and covered the box and I added one of the coordinating embellishments from the Brocade Assortment (Z1748). Isn't it pretty?


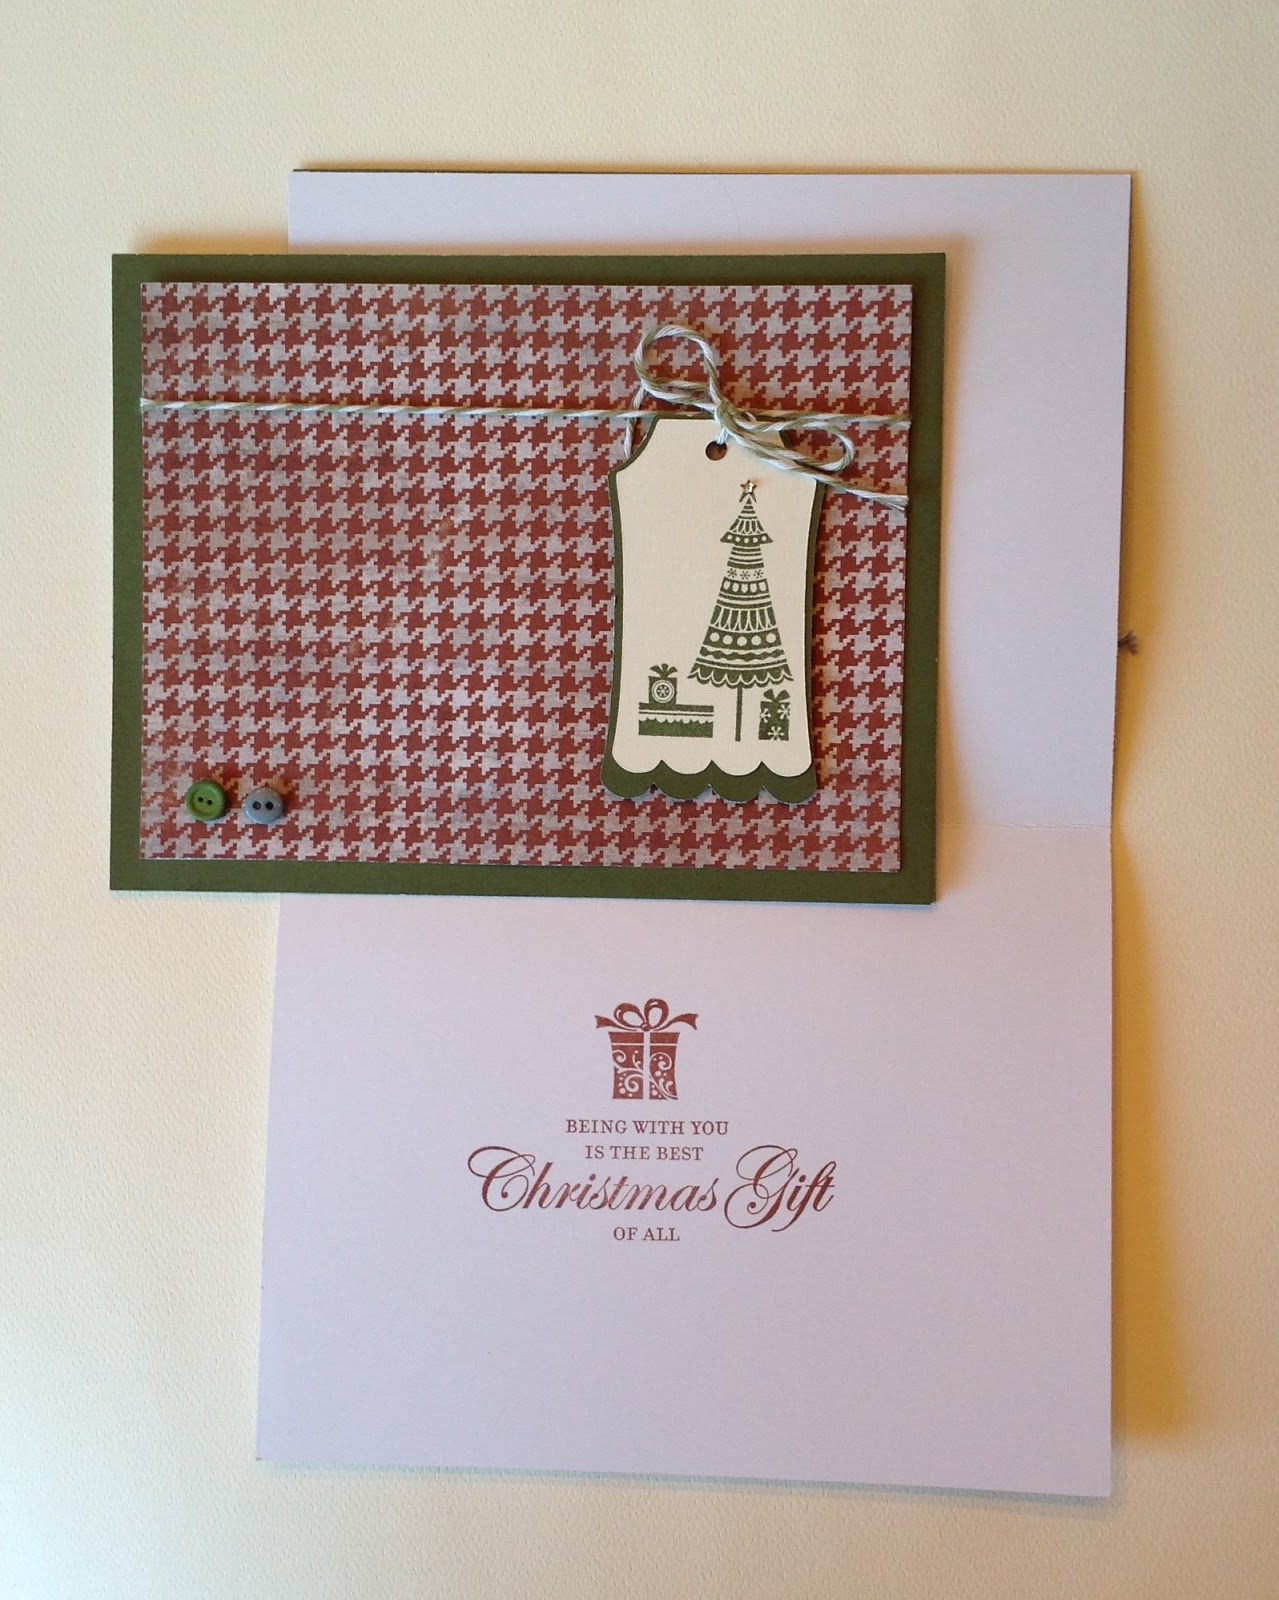
The second new WOTG for cards uses the Pear & Partridge paper, our Christmas design for this year. The WOTG (G1043) includes instructions, card bases and envelopes, patterned and solid cardstock, ribbon, red glitter gems, and a wonderful exclusive stamp set. 
 

I started out with this card, which has a pieced sentiment (that's how you get those red letters right in the middle of all the brown). The ribbon and the red bling really set it off.


I followed the directions to make the top card (although I did add some bitty sparkles from my stash to the top of each ornament). However, I couldn't resist using the cute birds that are also included in the stamp set, so I moved my branch down and my sentiment up.
 
 
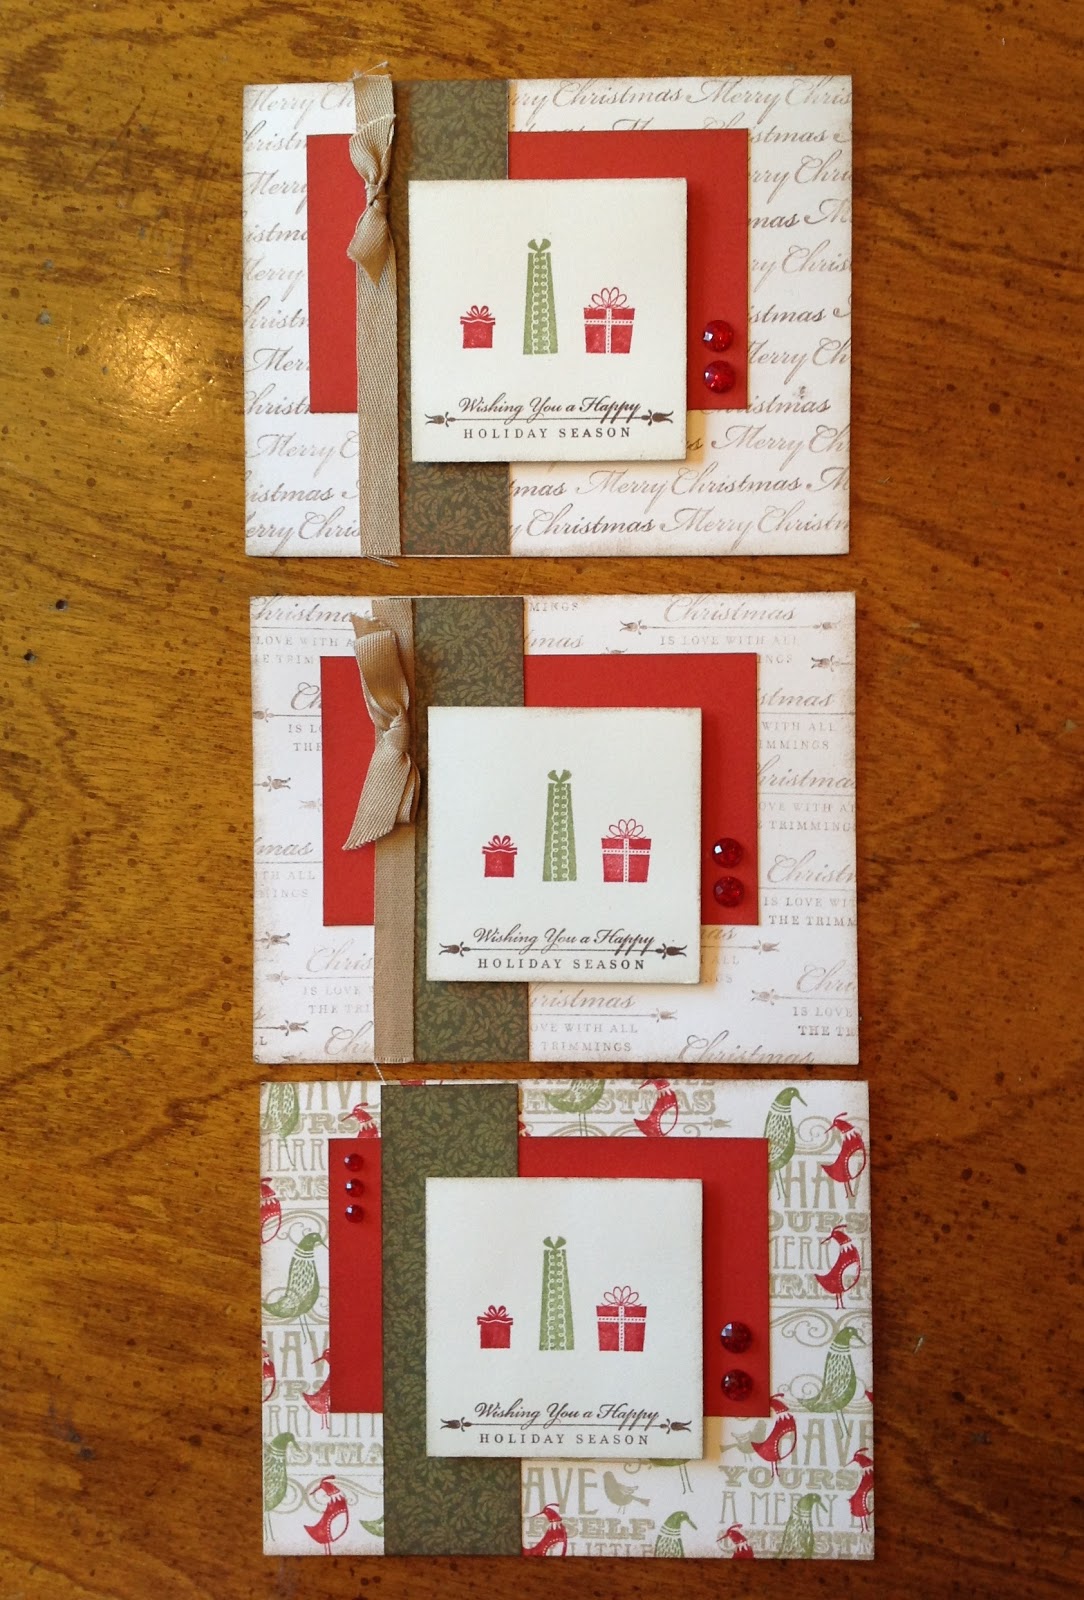
By the time I got to the third card, I was really feeling creative, so I played around with the stamped backgrounds.
  • The top card is stamped with Merry Christmas, using second generation stamping to lighten it up a bit.
  • The second card uses the same technique, but a different stamp from the set.
  • I abandoned subtlety in the third card and used three stamps and three inks to create a colorful, bold pattern.
If you like making cards, I really recommend these cardmaking Workshops on the Go. Each kit is designed to make 15 cards (5 each of 3 patterns). The papers and embellishments are lovely and the directions are clear. You can follow them to the letter, but the stamp sets include extra images so you can change it up a bit if you're feeling adventurous and creative. Enjoy!
 

Christmas Cards - Annual Card Workshop

Wow, I could hardly believe it when I saw that my last post was in July. I apologize for the long delay. I've been making lots of projects, but I've been so dissatisfied with the quality of my photos, I could hardly bear to post them. Well, I have a new iPad-4 now, so I'll try that and see how the photos look. I'm going to post several projects today, but I'll make each one a separate post so the projects will be easier to find in the future.

Starting with the last first, here are the cards I made for our annual Christmas card workshop a couple of weeks ago. All the supplies used are from Close To My Heart.


This card uses these two stamp sets: Snowflakes (D1480) for the flowers and Christmas Love (D1492 for the sentiment. The inside is stamped MERRY CHRISTMAS. The poinsettias are made of snowflake shapes cut using the Art Philosophy Cricut Cartridge (Z1686 - available only from Close To My Heart). The flowers are put together using dimensional foam adhesive, and they're decorated with Glitz glitter get (red, green, and almond).

 
This card uses one of the patterned papers from the Dakota paper pack (X7157B), the tag is cut out using Art Philosophy and the stamps are Very Merry Christmas (S1210 - October Stamp of the Month) and Christmas Love (D1492). There's a bit of baker's twine tied to the tag.
 

My fellow consultants (Anne Robertson, Sally Atlas, Terri Howard) and I put on a Christmas card workshop every year in the fall, and a birthday card workshop every year in the spring. It's a great time - 8 cards from 4 designers, all done in 4 hours. Drop me a line if you'd like to be added to the notification list for these workshops or any of our others.

Monday, July 30, 2012

2nd Wednesday Project Club - My Creations Bracket Frame

Anne, Sally and I are presenting a really fun project for our next 2nd Wednesday Project Club.  We'll be bringing the new My Creations Bracket Frame from our new catalog. This is a pre-asssembled chipboard frame - 11" outer dimension, 7" inner dimension. Since they're made of our high quality white chipboard, the creative possibilities are amazing. You can paint them, stamp them, cover them with paper or fabric, glue stuff to them. The frames are an inch deep, so you can recess your photo and give it dimension or add objects like flowers, shells, even small toys.

Our August Project Club will be held on Wednesday, August 8 from 6:30 - 8:30 at the Round Table Pizza at 9500 Greenback Lane. Cost is $15.

The deadline to RSVP is Tuesday, July 31, so call or email right away.

By the way, we call this a club, but it's very casual -- you don't have to be a member or anything. Just call or email to sign up.

We'll provide the frames, a variety of papers and embellishments and tons of "expert" advice.

We saw so many wonderful samples when we were at CTMH Convention in Dallas. My pictures are not very good (low light and old iPhone), but I think you'll get the idea of how versatile and fun these frames are.


Aren't they great?

Tuesday, June 19, 2012

Studio J Layouts for CTMH Convention

Wow, only 22 days left before Close To My Heart Convention!  My friends Sally and Anne and I are getting geared up, psyched up, revved up ---- you name it! We're UP for this. In just about three weeks we'll be heading for Dallas, Texas along with hundreds of our fellow consultants.

In case you haven't heard us talk about it, our convention is three days of total immersion in the CTMH world -- new products, card swaps, demonstrations, business classes, "celebrity" sightings, card swaps, super make-n-takes and card swaps. We get our first look at the new Autumn/Winter catalog, browse through tons of artwork up close and personal, and just swarm around with hundreds of like-minded folks. Can you imagine the energy of a ballroom filled to capacity with (mostly) women screaming and swooning over new products, laughing hysterically at the staff's antics, cheering wildly (and maybe dropping a tear or two) over Jeanette's true life stories? It's awesome.

The "show" is always great at Convention. Every day starts with a general session and the production values are great. Jeanette must include a humor screening in the corporate hiring process because the CTMH staff who come to Convention are warm, witty, and willing to go the extra mile to be hilarious. We've seen videos, skits, musical dance numbers and game shows -- not to mention funny wigs, outrageous costumes and celebrity impersonations. (Picture Jeanette Lynton as Donald Trump!)

Every year, CTMH adds something new to the Convention experience. This year they're offering us a terrific perk -- each consultant who attends Convention gets five free Studio J layouts. CTMH created a series of projects to help us hone our skills on our exclusive online design software. Now I have to admit --- it's fabulous! I learned a bunch of new tricks -- it really is amazing what you can do with a bit of imagination.  Just to give you a taste, here are the layouts I made:


If you're interested in learning more about Studio J, let me know. I'll be happy to share what I've learned. Happy Scrappin!

Thursday, May 31, 2012

2nd Wednesday

Hello fellow scrappers and stampers:

It's month 3 for our project club - Sally, Anne and I are really enjoying coming up with new things for you to make! This is the club that meets on the second Wednesday of the month (except July and December), so we're going to call it "2nd Wednesday". (Pretty creative!)

This month we're going to be making a mini-album from 6x6 kraft paper cards, using the Close To My Heart paper – Stella, with the Complements Canvas Shapes.

I copied this picture off Sally's blog to give you a taste, but pop on over there to check out more views after you read the details below. Look to the right of this posting to find a link to Sally's blog.


Here are the details:

~ Stella Mini-album Workshop

~ Wednesday, June 13th· 6:30 - 8:30 PM

~ Round Table Pizza at 9500 Greenback Ln # 1, Folsom, CA [I know it's confusing that we're having clubs at two different RTP, but this is the one near Ace Hardware and Big Lots, where Madison and Greenback come together.]

~ Cost is $15

~ Contact Shelley, Anne or Sally to register by June 1. [We may have some availability after that -- just check with one of us.]

We're looking forward to seeing you!

Tuesday, April 24, 2012

These Cards Are Beachy!

As I mentioned last month, Sally, Anne and I have started up a new club that meets on the second Wednesday of the month (except July, and December - I think). This month we're going to be making a set of five (5) cards and a matching box.


These cards use the Close To My Heart paper - Footloose, and are embellished with Seaside Wooden Shapes and Mocha Opaques. The cards and envelopes fit into this cool box and would make a great gift for someone else -- or YOU!


Before I post the rest of the pictures, here are the details:
  • Footloose Card Workshop
  • Wednesday, May 9
  • 6:30 - 8:30 PM
  • Round Table Pizza at 9500 Greenback Ln # 1, Folsom, CA  [I know it's confusing that we're having clubs at two different RTP, but this is the one near Ace Hardware and Big Lots, where Madison and Greenback come together.]
  • Cost is $15
  • RSVP to register by April 30 [Send an email to me at montanabaitshop@hotmail.com]
We will have a limited number of spots for this workshop, so please respond early.

These cards were really fun to make and I know you'll love how they turn out. The wooden shell shapes are really beautiful.  The cards are all 5-1/2" x 4-1/4". The project includes 5 cards with envelopes and the box.
Here are some more pictures showing the card details:


[Special thanks to our fellow CTMH consultant, Debbi Fournier who provided the inspiration for this project.]


Tuesday, April 17, 2012

April Cards

Wow, we've had a great crafting month so far. Anne, Sally and I put on a banner workshop last week and everyone made such great banners. I had great plans of taking lots of pictures to post here on my blog, but those ladies had me running! I didn't even see all the completed banners and I didn't get one single picture.

Here's an idea -- if you were at the banner workshop last week, take a picture of your banner and send it to me. I'd love to post some photos of the finished projects. Better yet, put yourself in the picture too!

Okay, on to the next papercrafting opportunity. Tomorrow night (Wednesday, April 18), Sally and I will have our monthly club, affectionately known as S101. We'll be making cards this month and Sally has already posted hers on her blog. (Check the right side of this page -- there's a link to Sally's blog.)

And now here are mine.


I had a great time making these. I especially love how these flowers turned out.  I'll put together a post later on to tell you how I made them -- but I don't want to let the cat out of the bag before our club tomorrow night.

Let me know what you think!

Thursday, March 29, 2012

Crazy for Banners

One of the NEW items that showed up in our Close To My Heart Spring/Summer 2012 Idea Book is the My Creations Mini Banner (check it out on page 131). I couldn't wait to get my hands on one to recreate the banner made with LUCY paper for my friend --- um--- Lucy.

LUCY

Made with Lucy paper


Turns out these things are pretty addictive.  Since making that first banner in January, I've made five or six more.  Here's the one I made last night.

USA

Made with Superhero paper

When I shared these with Sally and Anne, we couldn't wait to have a workshop. Luckily, the perfect time and place presented itself, so here are the details:
  • When: Wednesday, April 11; 6:30 - 8:30
  • Where: Round Table Pizza at Madison and Greenback (on the edge of Orangevale/Folsom)
  • What: You'll receive a complete My Creations Mini Banner. That's 10 white chipboard pennants in 4 different shapes. We'll provide everything you need to make 1 or 2 or 3 banners -- it all depends on the words you choose.  We'll pre-cut the paper (using the fabulous CTMH Art Philosophy Cricut Cartridge), provide the ribbon, and throw in a few embellishments to jazz it up. You just bring adhesives and your imagination.
  • Cost: $15
  • How: Send me an email at montanabaitshop@hotmail.com.
  • Please reserve your spot by April 2nd. We have to order things and cut things!
Here are a few words that would make great banners: FAMILY, LOVE, SMILE, CREATE, EAT, BE NICE, CELEBRATE, PEACE, your name, your family name, your kid's name, your boss's name...

Here are some more banners for inspiration:

SMILE

Made with Stella paper


WELCOME

Made with all kinds of paper and flowers and blingy things!

(Sorry the pictures aren't better. I promise to work on that when the weather gets better!)
  I hope you decide to join us. I have had so much fun making these banners and I'm sure you will too.


Tuesday, February 14, 2012

Par!adise Paper Flowers - Kicked Up a Notch!

Hello, it's time for me to go to bed, but I just had to post a couple of pictures of these embellishments I put together last night. I was working on the cards for my next Scrapbooking 101 and came up with these.  In the end, I didn't use them for my cards, but they were a lot of fun to make.


Aren't they cute? I started with the Creme Brulee Blossoms in the Close To My Heart Paradise Paper Flowers and sponged the edges with Brown Bag ink to give them a little added dimension.


I had some trouble finding just the right center. I found a bag of CTMH wooden buttons that were the right size, but they just didn't have the zing I was looking for. Digging through my supplies, I found a Krylon Pale Gold Leafing Pen that I had picked up at Scrapbook Expo last fall. I colored the buttons andgot just the effect I wanted. I finished them off by threading the button with Chocolate Waxy Flax and attaching it to the flower with a glue dot.


I'm really pleased with how they turned out. Now I just need to build a project around them.

Tomorrow I'll post pictures of the cards for S101.


Thursday, February 9, 2012

My Lucy Banner

On February 1, Close To My Heart kicked off a brand new catalog, the 2012 Spring/Summer Idea Book.  After all these years as a customer and then a consultant, I'm still thrilled to see the new paper and new products each time a catalog is released. 

This time, the design crew outdid themselves and named TWO of the new paper packs after friends of mine --- Stella and Lucy!

I haven't had a chance to try out Stella yet, but I just had to recreate the banner shown on page 26 for my friend Lucy. If you look hard, you'll see a few differences between theirs and mine, but I definitely drew inspiration from that picture.

The banner was so easy. We have a brand new chipboard banner -- 10 pieces in 4 different shapes -- and it matches shapes on the Art Philosophy Cricut Cartridge.  I also cut out scallops from the AP cartridge and followed the directions for Yo-Yo Flowers on page 27. The name is spelled out with our new chipboard letters -- I used a brayer to roll Pear ink on them, but they also coordinate with the AP cartridge.

But enough talk -- here are some pictures:


Isn't it fun?