Showing posts with label Mini-album. Show all posts

Sunday, September 4, 2016

Whimsy Baby Book

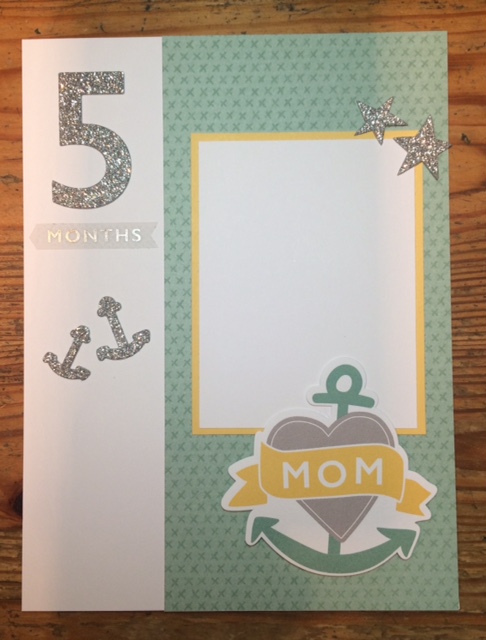
Are you looking for a special baby gift or a way to commemorate a little one's first year? This kit makes a quick, easy, and darn cute baby book. This is an easy project, suitable for crafters of all skill levels. All the products used are from Close To My Heart (CTMH). 


This album is made with the CTMH Whimsy Creative Collection and coordinating Boy or Girl Complements (a collection of vellum, glitter, foil and cardstock sticker embellishments). All the pieces are pre-cut and ready to assemble quickly. For maximum flexibility, you can choose just the items you want in either 6" x 8" or 8" x 8" format. (Kit options below.)


These posts show pictures of all the pages:
Kit details:

  • Basic Kit - Includes pre-cut papers for 12 page layouts, Boy or Girl Complements, and full-color assembly guide. You provide your own base pages (6"x 8" or 8" x 8"), photo placeholders, and album. [$25]
  • Better Kit - Includes the Basic Kit PLUS White Daisy cardstock base pages and photo placeholders.  You provide your own album. Choose the size you want:
    • 6" x 8" [$28]
    • 8" x 8" [$31]
  • Best Kit - Includes Better Kit PLUS beautiful Sea Glass Leatherette album and page protectors. This option is available only in 6" x 8". I do not have 8" x 8" albums or page projectors. [$50]
All prices include tax and shipping and handling to the Sacramento, California area. If you are not local to Sacramento, California, contact me for additional shipping changes. I'll keep the price as low as I can.

Be sure to specify Boy or Girl and the size format (6" x 8" or 8" x 8") when you order. Kits will ship after payment clears.

Send me an email if you have questions, or to order the kit: montanabaitshop@hotmail.com

View the CTMH products in the new Idea Book on my website here: Shop with Shelley
Note: The Sea Glass album is in the Seasonal Expressions catalog, which is available 9/1 - 12/31/2016.
 

Thanks for checking out my blog!


Baby Girl Book - Pictures

These are the photos of the Girl Baby Book. See my post Whimsy Baby Book for information on products used and how to order kits. Check out this post Baby Boy Book - Pictures for the boy version.


Baby Boy Book - Pictures

These are the photos of the Boy Baby Book. See my post Whimsy Baby Book for information on products used and how to order kits. Check out this post Baby Girl Book - Pictures for the girl version.


Wednesday, July 15, 2015

Roomie Gifts - Mini Albums

I just returned from the Close To My Heart annual convention a couple of days ago. It was four days of inspiration, awesome artwork, tremendous cuteness and extended laughter. One of my favorite events was the Consultants' Creativity Showcase, where we could show off some of our recent ideas and share ideas. I'll be posting information about my display soon, but today I want to share some pictures of the roomie gifts I made. These are all based on a pattern I found in an Annie's Attic book. I'll publish the title tomorrow. 

Update: I found the directions for these mini albums in a great book from Annie's Paper Crafts. It's called Interactive Mini Scrapbooks by Kathy Orta Files.  I bought it at the Stamp Art Shoppe in Roseville, California (http://thestampartshoppe.com/) but you may also be able to find it online. I made a few changes to the design, but it works great "as-is".


Sunday, July 6, 2014

Timberline Mini Album


I just finished putting together this mini album using the Timberline Paper Packet from the Close To My Heart 2014 Spring-Summer Idea Book. I love this paper -- the colors and patterns are great and it's perfect for camping and hiking photos.
 
I was able to put this together pretty quickly because patterned papers go together so well and the coordinating cardstock colors are included too. I made all the page titles and embellishments on the Cricut using the CTMH exclusive cartridge, Artbooking.
 
Here are some pictures of the inner pages:


I originally made this mini just for myself, but it was so much fun and went together so easily, I thought I'd offer it as a kit. If you would like one, be sure to let me know right away because this paper will retire at the end of July and it may sell out before then.

Here's what you'll get:
  • My Creations Kraft 3-Ring Binder (approximately 9" x 9")
  • Timberline paper cut to make all the layouts as shown here.
  • 14 Cricut elements shown here (Explore, 3 pine trees, arrow border, My Favorite Photos, Discover, Together, Great Outdoors, tree branch, Campfire photo mat, Banner photo mat, Date box, wood grain overlay).
  • Pictures of all the layouts, with tips and recommendations for putting them together.
Note: The binder comes without any pages. There are many choices for making the base pages, so I will leave it up to you. I made mine with corrugated cardboard, but it's a bit thick. You could use thinner cardboard or even two pieces of cardstock glued together. I made my base pages 8" wide x 7-12 " high. This leaves a 1/4" border around all the layouts when they're done. (If  you have trouble with the base pages, I can help.)

The kits are $20. If you would like me to ship it to you, I'll check on the shipping cost and let you know how much that will be.

Remember -- this paper pack is retiring at the end of July and may not even be available that long. Send me an email right away if you would like a kit. (My email address is montanabaitshop@hotmail.com . Thanks! 

Monday, June 30, 2014

My Projects in the Consultants' Creative Showcase

After making a short detour to San Diego, I just got back home from Close To My Heart convention at the Disneyland Hotel. It was a great event, packed with delicious moments --- and not all of them had calories! I'll probably be posting about it for several days, but first I need to fulfill a promise I made to post the recipes.

One of the new events added to Convention this year was the Consultants' Creative Showcase. We all had the opportunity to bring in some of our own artwork and display it for all of our fellow consultants to enjoy. There were so many lovely things there --- my fellow consultants are amazingly creative. Here's a picture of my display area:


Not a very inspired display, but I do have some new pieces that I'm pretty happy with.

Firecrackers
 
These are made with the My Creations Kraft Containers (Z1833). I cut stripes and stars from Cranberry, Outdoor Denim and Bamboo cardstock. The stars were cut on the Cricut using the Art Philosophy cartridge (Z1686). I sanded the edges of everything to distress them a little. The fuses are make of black wire, folded in half and wound around a pencil. I punched a hole in each lid and large star with an old eyelet punch, inserted the wire and taped it inside. I covered the raw ends with another star inside the lid. I put rubber bands around the pieces while the glue dried. Fun and easy!
 
 
Canvas #1


I found this saying on Pinterest and it just tickled me. I used one of our My Creations 6x6 Canvas Displays (Z1818), and colored it with our Exclusive Inks Pigment Inks. I recommend you try it out on cardstock first to get the effect you want. I think I used Buttercup, Honey, Sunset, Pear, Topiary, Lagoon and Pacifica. I used a Tim Holtz tool to apply the ink, but a sponge, or Sponge Dauber, or Texture Tool would work too. I stamped the words with our July Stamp of the Month: Circus Alphabet (S1407). The stars are retired Dimensional Elements and the flowers are retired Colonial White Rosette Ribbon, which I colored with the Pigment Inks and glued with Liquid Glass (Z679). I also smeared some green glitter glue around the bottom right quadrant and put Clear Sparkles in the centers of the flowers to make it sparkly.

 Save the Bees
 
This is another My Creations 6x6 Canvas Display (Z1818). I covered this one with modeling paste (see below) and stamped into it with the Honeycomb (C1537) stamp while it was wet to create some texture. I let it dry all night, then colored it with our Exclusive Inks Pigment Inks and stamped with the Circus Alphabet again. I even made the little bees from the Circus Alphabet by stamping small "B" for the bodies, and coloring the bodies with a Sunset marker and Black marker stripes. The wings are small "E" stamped on some old gray vellum I had in my stash. I cut them all out and glued them together and then glued them on the canvas so the wings stick out.

Here's the "before" picture:


 Here's the last of the new projects I made for the Showcase. It's a mini album in a box, all made with our Jubilee Paper Packet (X7181B) and coordinating products.


The box is a My Creations Journaling Cards Box (Z1953). These are just the right size to hold our Picture My Life cards, but I took out the little stair-step riser insert so there's be room for the mini album. I covered the box with Jubilee paper, wrapped it with our Burlap Ribbon (Z1760), and added  rolled flowers that I made with the Jubilee Textiles (Z1971).


Here's the cover of the mini album. I covered two pieces of cardboard with the Jubilee Textiles to make the front and back. The title is from the Jubilee Complements (X7181C). I made the inner pages using the Artbooking Cricut cartridge (Z1906). They're all from the baby book shown on pages 50-51, but I cut off the "baby" parts and cut them smaller -- I think it was 5.75 inches. There are some really cute envelopes and tags and overlays that go together like a dream. I embellished the whole thing with more of the Jubilee Complements, Jubilee zip strips, and pieces of Jubilee Textiles, cut to use as ribbons. Here are some sample pages:


If you would like to order any of the products used to make these projects, you can contact me directly via email (montanabaitshop@hotmail.com) or use the Shop Online link on the upper right side of the home page. Please note that some of these products will be retiring at the end of July, so if you are interested in recreating these projects, you should order as soon as possible.

If you have questions about any of these projects, or the items I did not address, leave a comment or contact me via email and I will get back to you very soon.

Thanks for taking a look.