Showing posts with label 3D items. Show all posts

Wednesday, August 13, 2014

Seaside Projects - My Personal Special for August

Here's a new project I've been working on for a while. I fell I love with this Seaside paper packet the minute I saw it in the new Close To My Heart Annual Inspirations.  I couldn't wait to get started making pretty things and I felt sure you would feel the same way. To help you get off to a quick start, I've designed this 2-page scrapbook layout, 2 cards and a beachy mini-book. Check out these pictures and then at the bottom of the post, I'll share the details of how you can get instructions for all these projects.
 
Here are the flower details from the layout. They're decorated with the Gold Sequins and metal charms from the Seaside Assortment.


The cards are standard A2 size (5.5 x 4.25). I stamped the shells with the Treasured Friendship stamp set, but you could make something similar using the Seaside Complements.
 
 
Here's the mini-book -- perfect for preserving memories of a beach vacation. It's approximately 4" x 4", and has five pocketed pages with lots of tags and pull-outs. I've embellished it with the Seaside Complements and the metal charm on the front is from the Seaside Assortment. This is a representative sample of the inner pages.


What do you think? I'm very happy with them and I hope you like them too. If you'd like directions, here's all you need to do. Just order the Seaside paper packet and at least one coordinating embellishment or stamp set from my online shopping site.
 
I'll email you the directions, cutting diagrams, and photos. I will also include photos of two bonus cards that I made to finish off the paper packet. Easy-peasy . . .  to reach my shopping site, click on the shopping cart link here on my blog.
 
I used a Cricut to make the flowers, tags, and mini-book cover, but I will include tips for making the projects without a Cricut, and a template for the mini-book cover.
 
These are the supplies I used for the projects:
X7192B Seaside Paper Packet ($9.95)
X7192C Seaside Complements ($4.95)
Z3014 Seaside Assortment ($5.95)
C1594 Treasured Memories ($13.95)
Z2012 Sequins - Gold Assortment ($2.95)
Z1989 Slate Diagonal Striped Ribbon ($3.95)
 
I also used Z2114 Cocoa stamp pad to stamp the shells/sentiments and distress edges, and Z2192 Pacifica ink to shade the flowers.
 
Remember, all you need to do is order the Seaside paper packet and at least one coordinating embellishment or stamp set from my online shopping site and I will email the directions to you.
 
 Thanks for stopping by!


Monday, June 30, 2014

My Projects in the Consultants' Creative Showcase

After making a short detour to San Diego, I just got back home from Close To My Heart convention at the Disneyland Hotel. It was a great event, packed with delicious moments --- and not all of them had calories! I'll probably be posting about it for several days, but first I need to fulfill a promise I made to post the recipes.

One of the new events added to Convention this year was the Consultants' Creative Showcase. We all had the opportunity to bring in some of our own artwork and display it for all of our fellow consultants to enjoy. There were so many lovely things there --- my fellow consultants are amazingly creative. Here's a picture of my display area:


Not a very inspired display, but I do have some new pieces that I'm pretty happy with.

Firecrackers
 
These are made with the My Creations Kraft Containers (Z1833). I cut stripes and stars from Cranberry, Outdoor Denim and Bamboo cardstock. The stars were cut on the Cricut using the Art Philosophy cartridge (Z1686). I sanded the edges of everything to distress them a little. The fuses are make of black wire, folded in half and wound around a pencil. I punched a hole in each lid and large star with an old eyelet punch, inserted the wire and taped it inside. I covered the raw ends with another star inside the lid. I put rubber bands around the pieces while the glue dried. Fun and easy!
 
 
Canvas #1


I found this saying on Pinterest and it just tickled me. I used one of our My Creations 6x6 Canvas Displays (Z1818), and colored it with our Exclusive Inks Pigment Inks. I recommend you try it out on cardstock first to get the effect you want. I think I used Buttercup, Honey, Sunset, Pear, Topiary, Lagoon and Pacifica. I used a Tim Holtz tool to apply the ink, but a sponge, or Sponge Dauber, or Texture Tool would work too. I stamped the words with our July Stamp of the Month: Circus Alphabet (S1407). The stars are retired Dimensional Elements and the flowers are retired Colonial White Rosette Ribbon, which I colored with the Pigment Inks and glued with Liquid Glass (Z679). I also smeared some green glitter glue around the bottom right quadrant and put Clear Sparkles in the centers of the flowers to make it sparkly.

 Save the Bees
 
This is another My Creations 6x6 Canvas Display (Z1818). I covered this one with modeling paste (see below) and stamped into it with the Honeycomb (C1537) stamp while it was wet to create some texture. I let it dry all night, then colored it with our Exclusive Inks Pigment Inks and stamped with the Circus Alphabet again. I even made the little bees from the Circus Alphabet by stamping small "B" for the bodies, and coloring the bodies with a Sunset marker and Black marker stripes. The wings are small "E" stamped on some old gray vellum I had in my stash. I cut them all out and glued them together and then glued them on the canvas so the wings stick out.

Here's the "before" picture:


 Here's the last of the new projects I made for the Showcase. It's a mini album in a box, all made with our Jubilee Paper Packet (X7181B) and coordinating products.


The box is a My Creations Journaling Cards Box (Z1953). These are just the right size to hold our Picture My Life cards, but I took out the little stair-step riser insert so there's be room for the mini album. I covered the box with Jubilee paper, wrapped it with our Burlap Ribbon (Z1760), and added  rolled flowers that I made with the Jubilee Textiles (Z1971).


Here's the cover of the mini album. I covered two pieces of cardboard with the Jubilee Textiles to make the front and back. The title is from the Jubilee Complements (X7181C). I made the inner pages using the Artbooking Cricut cartridge (Z1906). They're all from the baby book shown on pages 50-51, but I cut off the "baby" parts and cut them smaller -- I think it was 5.75 inches. There are some really cute envelopes and tags and overlays that go together like a dream. I embellished the whole thing with more of the Jubilee Complements, Jubilee zip strips, and pieces of Jubilee Textiles, cut to use as ribbons. Here are some sample pages:


If you would like to order any of the products used to make these projects, you can contact me directly via email (montanabaitshop@hotmail.com) or use the Shop Online link on the upper right side of the home page. Please note that some of these products will be retiring at the end of July, so if you are interested in recreating these projects, you should order as soon as possible.

If you have questions about any of these projects, or the items I did not address, leave a comment or contact me via email and I will get back to you very soon.

Thanks for taking a look.

Friday, March 1, 2013

Clemantine Fall Card Set

Here's a fun project we made at one of our Second Wednesday clubs. All the supplies are from Close To My Heart. The cards are made with the Clemantine paper pack (X7156B), Bohemian Assortment embellishments (Z1687), Color-Ready Seam Binding Ribbon (Z1732), and Mocha Opaques (Z1333). The cute little "magazine holder" box is made on the Cricut using the Artiste cartridge (Z1790 - available only from CTMH.)


The stamps used were Fall Harvest (C1504), Fall Favorites (S1209 - September Stamp of the Month) and 4 My Friend (D1510).

Our Second Wednesday club is open to anyone who signs up in advance for the projects. My friends Sally Atlas, Anne Robertson and I started the club because we have so many friends who wanted to make home decor items, mini albums, gifts and more cards. We typically make cards every other month and some kind of 3-D project on the other months. We won't be meeting in December, but we'll start up again in January. Drop me an email if you're interested in being added to the monthly announcement.

Wednesday, February 20, 2013

Memories of Stampin' Memories

I am still trying to catch up on my sleep after a great weekend with my stampin' and scrappin' buddies at Stampin' Memories. Four times a year we occupy the Bradley House in Folsom and lose ourselves in a frenzy of stamping, glueing, die-cutting, texturing, embellishing and just about anything else you can think up to do with pretty paper and photos. Oh, and then there are the breakfasts (indescribably beautiful and delish), homemade cookies and cupcakes in the afternoon, and a bit of wine tasting in the evenings. We share ideas, celebrate completed projects, and win fabulous prizes. We tell hilarious stories about our friends and families --- and our own foibles. We laugh a lot and stay up much too late. It's fantastic. Can you tell I love it?
 
Amazingly, amongst all the fun, I even got a few little projects done.
 
Here's a scrapbook layout showing pictures of a dinner party at Joe's Crab Shack with Kristian's workmates.


I won this great 7 Gypsies Mouse Trap Memo Board in the White Elephant exchange and spent most of Saturday, turning it into a cute reminder board using our new Buzz and Bumble paper.


Another layout - this one has pictures from our first trip up to visit Joey after he started his job at Sugar Bowl. I made my own background paper with random stamping.


Finally, here are a few cards and a photo cube I made. The paisley card uses the triple stamping technique that's so popular now. The butterfly cards were made with a Martha Stewart punch and a Cuttlebug texture plate (very easy).  Of course the photo cube is all about Joey.


More to come!


Monday, July 30, 2012

2nd Wednesday Project Club - My Creations Bracket Frame

Anne, Sally and I are presenting a really fun project for our next 2nd Wednesday Project Club.  We'll be bringing the new My Creations Bracket Frame from our new catalog. This is a pre-asssembled chipboard frame - 11" outer dimension, 7" inner dimension. Since they're made of our high quality white chipboard, the creative possibilities are amazing. You can paint them, stamp them, cover them with paper or fabric, glue stuff to them. The frames are an inch deep, so you can recess your photo and give it dimension or add objects like flowers, shells, even small toys.

Our August Project Club will be held on Wednesday, August 8 from 6:30 - 8:30 at the Round Table Pizza at 9500 Greenback Lane. Cost is $15.

The deadline to RSVP is Tuesday, July 31, so call or email right away.

By the way, we call this a club, but it's very casual -- you don't have to be a member or anything. Just call or email to sign up.

We'll provide the frames, a variety of papers and embellishments and tons of "expert" advice.

We saw so many wonderful samples when we were at CTMH Convention in Dallas. My pictures are not very good (low light and old iPhone), but I think you'll get the idea of how versatile and fun these frames are.


Aren't they great?

Thursday, May 31, 2012

2nd Wednesday

Hello fellow scrappers and stampers:

It's month 3 for our project club - Sally, Anne and I are really enjoying coming up with new things for you to make! This is the club that meets on the second Wednesday of the month (except July and December), so we're going to call it "2nd Wednesday". (Pretty creative!)

This month we're going to be making a mini-album from 6x6 kraft paper cards, using the Close To My Heart paper – Stella, with the Complements Canvas Shapes.

I copied this picture off Sally's blog to give you a taste, but pop on over there to check out more views after you read the details below. Look to the right of this posting to find a link to Sally's blog.


Here are the details:

~ Stella Mini-album Workshop

~ Wednesday, June 13th· 6:30 - 8:30 PM

~ Round Table Pizza at 9500 Greenback Ln # 1, Folsom, CA [I know it's confusing that we're having clubs at two different RTP, but this is the one near Ace Hardware and Big Lots, where Madison and Greenback come together.]

~ Cost is $15

~ Contact Shelley, Anne or Sally to register by June 1. [We may have some availability after that -- just check with one of us.]

We're looking forward to seeing you!

Thursday, March 29, 2012

Crazy for Banners

One of the NEW items that showed up in our Close To My Heart Spring/Summer 2012 Idea Book is the My Creations Mini Banner (check it out on page 131). I couldn't wait to get my hands on one to recreate the banner made with LUCY paper for my friend --- um--- Lucy.

LUCY

Made with Lucy paper


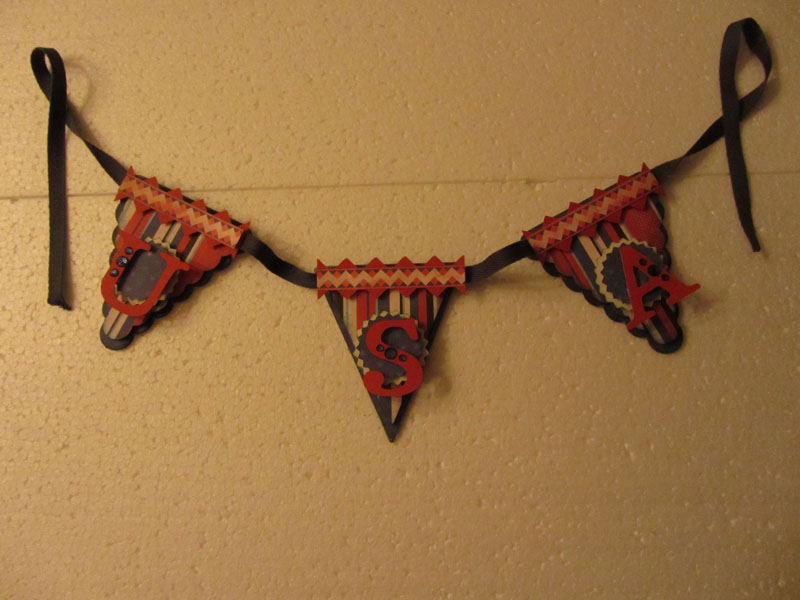
Turns out these things are pretty addictive.  Since making that first banner in January, I've made five or six more.  Here's the one I made last night.

USA

Made with Superhero paper

When I shared these with Sally and Anne, we couldn't wait to have a workshop. Luckily, the perfect time and place presented itself, so here are the details:
  • When: Wednesday, April 11; 6:30 - 8:30
  • Where: Round Table Pizza at Madison and Greenback (on the edge of Orangevale/Folsom)
  • What: You'll receive a complete My Creations Mini Banner. That's 10 white chipboard pennants in 4 different shapes. We'll provide everything you need to make 1 or 2 or 3 banners -- it all depends on the words you choose.  We'll pre-cut the paper (using the fabulous CTMH Art Philosophy Cricut Cartridge), provide the ribbon, and throw in a few embellishments to jazz it up. You just bring adhesives and your imagination.
  • Cost: $15
  • How: Send me an email at montanabaitshop@hotmail.com.
  • Please reserve your spot by April 2nd. We have to order things and cut things!
Here are a few words that would make great banners: FAMILY, LOVE, SMILE, CREATE, EAT, BE NICE, CELEBRATE, PEACE, your name, your family name, your kid's name, your boss's name...

Here are some more banners for inspiration:

SMILE

Made with Stella paper


WELCOME

Made with all kinds of paper and flowers and blingy things!

(Sorry the pictures aren't better. I promise to work on that when the weather gets better!)
  I hope you decide to join us. I have had so much fun making these banners and I'm sure you will too.


Thursday, February 9, 2012

My Lucy Banner

On February 1, Close To My Heart kicked off a brand new catalog, the 2012 Spring/Summer Idea Book.  After all these years as a customer and then a consultant, I'm still thrilled to see the new paper and new products each time a catalog is released. 

This time, the design crew outdid themselves and named TWO of the new paper packs after friends of mine --- Stella and Lucy!

I haven't had a chance to try out Stella yet, but I just had to recreate the banner shown on page 26 for my friend Lucy. If you look hard, you'll see a few differences between theirs and mine, but I definitely drew inspiration from that picture.

The banner was so easy. We have a brand new chipboard banner -- 10 pieces in 4 different shapes -- and it matches shapes on the Art Philosophy Cricut Cartridge.  I also cut out scallops from the AP cartridge and followed the directions for Yo-Yo Flowers on page 27. The name is spelled out with our new chipboard letters -- I used a brayer to roll Pear ink on them, but they also coordinate with the AP cartridge.

But enough talk -- here are some pictures:


Isn't it fun?

Saturday, July 9, 2011

Weekend Crafting

Once a month I teach a crafts class at Merrill Gardens.  There are typically 5 or 6 ladies who come to make door decorations or whatever else I think up.  Since we only have an hour or two, we concentrate on things that are not too complicated. We talk and laugh over our mistakes and get to know one another.  I really like it because it stretches me to do something other than scrapbooking and cardmaking, and the ladies are so delightful.  As I told them today, sometimes I wake up on Saturday morning and moan about having to get up and get moving right away, but when I'm with them, I thoroughly enjoy myself. They give me much more than I give them.

Today we  painted birdhouses.